About Me

My photo
Bigfork, Montana, USA
Bigfork Bay Cotton Company is a full service, brick and mortar quilt shop, as well as a retail/wholesale pattern business. You can view our pattern line on our website, but on a more personal level, we'd like to invite you into our shop and share with you the joy of quilting in our corner of the world!

Friday, November 27, 2009

SIMPLE PILLOWCASE LESSON

Fabric selection for these pillowcases is FUN! You will need three fabrics, one for the main body of the pillowcase, one for the accent flange, and one for the contrast strip.

Fabric requirements for one pillowcase are as follows:

Main body of pillowcase 3/4 yard, unless the fabric has a directional design that runs parallel to the selvedge...in that case you will need 1 3/4 yards
Contrast strip 1/4 yard
Accent flange 1 1/2 inches


All fabric should be cut desired length X width of fabric. You will need the entire width....
If the fabric for the main body of the pillowcase has a directional print that runs parallel to the selvedge, you will need 1 3/4 yards of fabric subcut to 1 3/4 yard by 27 inches.


The first thing you need to do is press the accent flange in half along its length, WRONG sides together.


Now you will begin layering your fabric......
First lay your contrast strip down on your table, right side up. Lay the accent flange on top of the strip, matching raw edges.


Lay the main body of the pillowcase on top of the other strips, right side down, again matching raw edges. Use a few pins to hold everything in place and make sure that the raw edges stay lined up nicely.


Begin rolling the loose end of the pillowcase up towards the pinned raw edges, forming a "tube" near the raw edges.


Bring the opposite raw edge of the contrast strip up over the "tube" and line up all the raw edges. Pin carefully along the raw edges, making sure that they all stay lined up together.


Begin sewing the "tube", using a 1/4" seam allowance. Backstitch when you start and when you stop.


Reach inside the tube and gently turn it inside out.


Press well. At this point you may choose to do some decorative stitching on either the contrast strip or the accent flange. You may also straight stitch along the seam where the accent flange meets the contrast strip to discourage the flange from flipping up. I haven't done either on my pillowcases.


Fold pillowcase in half, wrong sides together. Make sure that the accent flanges and the contrast strips line up. At this point, if your raw edges don't all match up (and most likely, they won't), lay the folded pillowcase on your cutting mat. Make sure the flange and the contrast strip are still lined up. Make sure the bottom edge of the pillowcase is straight along a line of your cutting mat. Square up the edge. You will notice in the picture that although I have squared up the side of my pillowcase, there is still some selvedge showing....this will not be a problem as it will be hidden in the seam allowance. Pin the raw edges together, making sure that the accent flanges are even. Pin carefully in this area so that when you sew they will stay line up nice and even.


Sew seam. Start at the end with the contrast band and backstitch at each end. Use a scant 1/4" seam allowance. Your machine will probably groan a little bit going over the lumps caused by the accent flange. Just go very slowly and use a sharp needle (microtex sharps or quilting needle, not universal) and you will be fine.
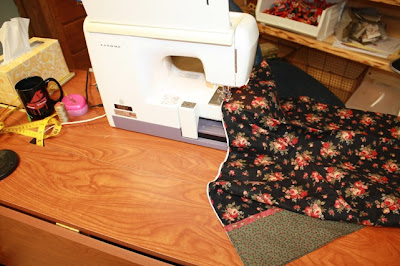


Turn pillowcase inside out. Press seam well, first pressing flat, then folding at the seam like and pressing again. You can see in the picture that I have used a sleeve board inside the pillowcase when pressing flat. This is helpful, but certainly not required.


Sew again, this time with a 3/8" seam allowance. Once again, backstitch at each end. This wider seam allowance will completely encase the previous seam allowance, allowing a nice, finished seam on the inside. You will see that I have used a seam/quilting guide that came with my machine....many machines come with this. If you do not have one, don't worry. You really don't need it. Just be sure to keep your seam allowance 3/8" so it encases the previous seam.


Turn pillowcase right side out and repeat the above process for the end seam, first sewing with wrong sides together with a scant 1/4" seam allowance, then turning right sides together and sewing with a 3/8" seam allowance.

Turn right side out and press.

Voila! You are done!

Tuesday, November 24, 2009

COMING SOON!! TWO NEW DESIGNS BY TONI WHITNEY! PLUS CHECK OUT THE FINISHED "WADING GEESE"


"Zirafah" by Toni Whitney


"Zebre" by Toni Whitney.


Here is the finished version of "Wading Geese" by Canadian artist Heather Soos. I wish you could see the water up close....OK Carol did an amazing job of capturing water that is still enough for a reflection, yet has ripples of movement where the feet and beak enter the water....


All three of these patterns are in the final stages of production. Patterns are being proofed and fabric has been ordered. We anticipate that Toni's patterns will be ready by the end of the year, and the Wading Geese will be available in January. We don't have pricing just yet, but we have taken some preorders already. If you want to be among the first to receive these, give us a call at 406-837-2399.

Friday, November 13, 2009

WOVEN RINGS SCRAP QUILT


This is another one of those scrap quilts that can be very simple to make, but with a little extra planning, can be a WOW quilt. The elements used in the block are very simple. You will use the same three basic units I talked about earlier, 2 1/2 inch square, 4 1/2 inch square, and 2 1/2 by 4 1/2 inch rectangle. Or you can use one of the alternate sizes I posted a few days ago. Your finished block will be twice the size of your larger square, so my finished block measures 8 inches. You will use the "connecting corners" method to make the quarter snowball unit. The block I have shown is completely scrappy, but you can choose to calm things down with one background fabric, as shown in my "finished" sample. Another way I have calmed things down in that quilt is to make each ring out of one fabric. This takes some planning as you are making your blocks, but the extra effort, I think, is well worth it.


In this multicolored version I have once again used the same fabric for each ring. In addition, I have "finished off" the rings with two pieced borders. This sounds much more complicated than it actually is. It is easily accomplished using snowball blocks and rectangles.

Thursday, November 12, 2009

"OUT TO LUNCH" !


Check out this adorable version of "Out to Lunch"!

Wednesday, November 11, 2009

STRIP PIECING HINTS

I am in the process of sewing a ton of strip sets for a Queen sized Nine Patch Pizzazz (love that book....). It brought to mind a few tricks and hints to insure a successful project.

When sewing strips together, start each strip you add at the opposite side from where the last strip was started. It's helpful to actually make a small mark or drop a pin in at the end you start your first pair of strips. Then start at the other end for the next strip you add, and so on. This prevents a "rainbow" effect from happening. This is most evident when sewing four or more strips, but why not do this for every set of strips?

Press after each strip is added. Take care not to move the iron around too much, and make sure whenever you do move the iron that you move parallel to the seam.

It is time consuming to subcut each strip set individually. However, problems can develop when you stack and cut multiple strip sets at the same time. I have found that if I follow each of these steps carefully, without taking shortcuts, my subcuts stay true and square.


After your strip set is pressed well, lay it out on your cutting mat, carefully aligning the edge of the strip set with one of the lines on the mat. (It is amazing how even two strips sewn together can wave and wobble a bit. Following the line on the mat encourages them to "straighten up".)


Lay a strip set on top of the previous strip set, taking care not to move the first strip set off of the line on the mat. Line the edge of the second strip set along a seam line of the first strip set as shown. As you can see in the photo, I have nestled the edge of the newest strip set against the first strip where the seam is pressed away from the newer strip set. When you are cutting, the motion of the cutter will keep that strip set tucked up nicely against the seam line.


Lay subsequent strips down the same way. Be careful not to move the strips that are already lying on the mat, and always line the edge of the newest strip along the seam line of a prior strip.


I usually layer no more than four strip sets. You don't want your stack to have thick "lumps", and you don't want it to get too wide.

Once all your strip sets are in place, doublecheck to make sure that the whole thing hasn't shifted off the line on the mat.

To square up the end, lay your ruler on the strips, aligning a line on the ruler with one of the seam lines on the top strip set. Do not use the edge of the strip sets for this! Trim to make a straight edge to start measuring and cutting.

Begin cutting your strip sets into the desired width, keeping a line of the ruler along a seam line of the top strip set.


After a couple of cuts, you will probably find that if you line your ruler up on a seam line, the edge doesn't line up. At this point it is time to square up the end again as in the previous step. You will also need to square up if you have to slide your strips down the mat to cut length that was hanging off the mat in the beginning.

Tuesday, November 10, 2009

UPCOMING PATTERN: WADING GEESE by HEATHER SOOS


We're so excited about this one!! This design is based on the artwork of Heather Soos, a new artist for us, who was named National Artist of the Year 2008 by Ducks Unlimited Canada. Heather's work is absolutely breathtaking! Visit her website, www.heathersoos.ca to see the original painting as well as the rest of her amazing artwork.

This pattern/quilt is still in the production line. OK Carol Rockwell has done an amazing job recreating this design in keeping with the original painting. The pattern itself, along with the fabric kits, will not be available until early 2010. At this point, we do not have pricing set, but it will be similar to our other patterns. I don't have any estimate for the fabric kit right now.

If you would like to place a preorder, give us a call at 406-837-2399.

Friday, November 6, 2009

SCRAPPY COLORBLOCK


This block is a great way to use up small squares cut from your stash (see previous post). One great idea passed along to me from a coworker is to keep a basket of your squares next to you at all times when you are piecing other blocks. Instead of using odd pieces from your garbage for your "starties" and "stoppies", pick up a pair of these squares and sew them together whenever you stop some other piecing. Then just place them back in the basket. You can either pick up another pair next time, or add on to the pair you've already sewn together!

Now, it looks like there are eight half square triangles in each block. But you can not piece them as individual half square triangles or they will turn out too small. Instead, treat them as you would if you were making flying geese with the flip and sew method.


First, sew two colored squares together.

Sew one background square on the diagonal, flip, trim and press.

Repeat for the other side.


There's no special trick to putting these projects together. The tablerunner is quick and easy, and of course you can make it as long as you want! For the inner border, you will want to cut your strips 1 1/2 inches. That way the math will work out to be able to use your squares for the outer border also. If you choose to use a print for the outer border, you can make the inner border any size you like!