About Me

My photo
Bigfork, Montana, USA
Bigfork Bay Cotton Company is a full service, brick and mortar quilt shop, as well as a retail/wholesale pattern business. You can view our pattern line on our website, but on a more personal level, we'd like to invite you into our shop and share with you the joy of quilting in our corner of the world!

Thursday, July 22, 2010

SOME OF MY APPLIQUE BLOCKS

Here are my first few blocks. I love Daiwabo fabrics and have been collecting them for a few years now. It was going to be either Daiwabos or Cherrywoods (my other obsession). I decided to go with the Daiwabos, obviously. Now the decision is to stitch around the applique with a blanket stitch or a tiny zigzag. I'm leaning towards the zigzag for a couple of reasons....the main reason being that all the stitching is on the applique, rather than on the background. This is important because then the applique/fusible/background provides enough stability that I don't need a stabilizer underneath and I won't get any puckering. Plus, the zigzag is more forgiving if i wander a bit...since the thread will match the applique piece, if I wander on the background it will really show. Of course I will be using AURIFIL 50 wt thread....there is nothing better. Period. Plus, I love their wide range of colors. I think that sometimes I will try to match the applique, but sometimes I might use a shade or two lighter or darker, or use the color next door, to add a little depth.

Did I tell you that there are 25 blocks, PLUS 25 border blocks? Yikes. If I had nothing else going on, I would try and get this done by December, when I have a spot reserved with an amazing longarm quilter. I'm going to give it a shot, but I know it is a really, really long shot. All that stitching is going to take a long time.....

By the way, I am using a new fusible. Well, it's not really new, just new to me....
SOFT FUSE, by Stacey Michell is wonderful. It is the best fusible I have used. We now have it on the bolt, and it is 36" wide! At $9 a yard, at that width, that's a bargain! Give it a try if you see it...I think you're going to like it!


Wednesday, July 21, 2010

I'M HAVING AN AFFAIR

Shocking, I know. It's so not like me. My husband knows all about it and seems okay with it...he's just concerned about the amount of time it will take away from "us".

Those who know me know that I'm pretty traditional....it's basically squares, rectangles, and triangles for me.

But then my friend Sylvia came up to me at Quilt Market and waved something in my face, and, well, what can I say? It's what I have been looking for, without knowing it, for a long time!


I always thought that I would have one Baltimore Album quilt in me. I have all those books, and every so often I would get them out and pore over the different blocks, imagining how I would make mine. Then I went through a Pat Campbell, Jacobean quilt phase. Remember, I am not really interested in applique. I am a happy piecer. I have done a couple of projects with applique, but nothing this ambitious.

Before I mislead you, I love my Janome, and it will be working just as hard as I will be in creating this quilt. My hand work is limited to English Paper Piecing and binding.

In case you can't read the fine print, this beautiful pattern is by Edyta Sitar of Laundry Basket Quilts.

And by the way, Sylvia is making a version also. Mine will be made with traditional cottons, but hers will be made with WOOL! I hope she will post her blocks also...her blog is excessivecompulsivesewing.blogspot.com .

I have a lot of the tracing done, and some blocks fused. I'll post a few tomorrow.....

Wednesday, July 7, 2010

FIRST MONDAY TOP

It's done! Karri is going to quilt it tomorrow, then I'll finish it off with red binding. Can't wait!

Tuesday, July 6, 2010

CHENILLE....EASY AS 1-2-3


This is really easy stuff. For this quilt I purchased three bear panels and backing fabric. Here's how to get started: Lay your backing fabric down right side down. Lay three (or more) layers of your feature fabric right side up . Pin all four (or more) layers together. Pin very carefully...as I place each pin through each layer I check to make sure the pin is entering each layer at the same place in the design. I use the same amount of pins as I would use if I were pin basting to quilt....placing pins about a hands width apart.

Take your longest ruler and draw a line across the quilt top near the center at a 45 degree angle. You only have to mark this one line! Stitch on this line. Then, using a seam guide, stitch parallel lines across the complete quilt top. Remove pins as you come to them. Instead of using a seam guide, you can also use the edge of your presser foot. Move your needle to the left until the distance from the needle to the edge of the presser foot is your desired width. You can determine for yourself how close you want these lines. For this quilt, my stitching lines are approximately 1/2" apart.


Here it is with all the stitching done!


It really helps to start your cuts ahead of time with scissors. Be very careful not to cut through the bottom layer and the backing. In this case, since there are only three layers, I just cut through the top two layers.


Place the guide through all but the bottom layer. Be really careful about this! (You will notice that I didn't start the cuts here with scissors. That is because I didn't figure that out yet...it took trying to start the cuts along the selvedge edges to realize that there is a better way!)


Use your nonslicing hand to hold the fabric firmly. When slicing gets harder, you simply rotate your blade to a new, sharp setting. I think I rotated it about three times for this quilt.
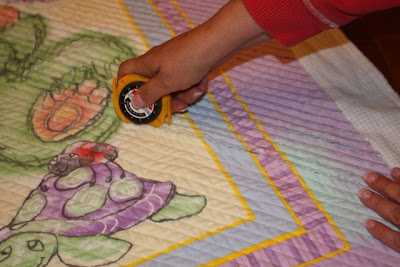


You can see here that I have sliced through about half of the quilt. Just keep going until you have sliced through all the channels you have sewn.


Every so often (more often when working with flannel) you will want to open up the chenille cutter and "defuzz". This is really easy to do! (You open it up the same way to change the blade.) To do this, turn the cutter over....


Slide out the black thingy.


The back of the cutter lifts off easily now. Try very hard not to rotate the blade as you lift it out to remove the fuzz....that way you keep your blade settings where they should be.


After all the slicing is done, I trim and square up the quilt and bind as if it were a normal quilt. Then I wash and dry it. You'll want to check the lint screen in your dryer several times during the drying cycle. The more often this quilt is washed, the softer it will get!


You can use any large print to make a throw rug as shown here, or placemats.


Here is a detail of the rug.......

Wednesday, June 30, 2010

ANOTHER GREAT PATTERN FROM MISS ROSIE'S!

I am at it again! Working on another great design from Miss Rosie's Quilt Company paired with a GORGEOUS kit from Bigfork Bay Cotton Company! I tell you, her patterns are a joy to work on. Her instructions are absolutely perfect, from cutting, to block construction, to assembly.


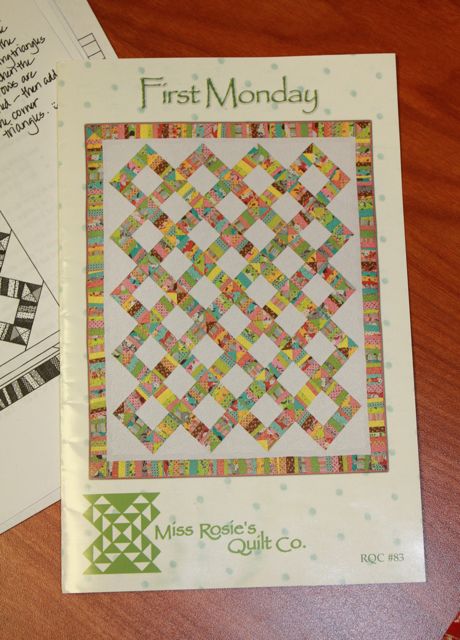
This is the pattern. I love the original version.....I think I am going to make it with the feedsacks that I have been collecting forever....but that's for later on. This version has a dark, mottled red background, and assorted cream/tan/gold prints, most having some red in them. Some are Christmas-y. (Did I mention that you can purchase the kit from us? We have a limited supply. Give us a call if you are interested....866-245-5718)


Started out making scrappy strip sets and subcutting them......SUPER EASY!


Made a bunch of scrappy hourglass blocks.....FUN!


All the block rows are pieced. Now I am piecing the sashing strips. I LOVE SCRAPPY!


Here is the start of it on my design wall. The red appears kind of orangey on my monitor, but it is really a nice darker red..... It is not a batik, but has a nice mottled look to it.


Stay tuned.....this one is going together really fast! Might even have it done for Christmas in July!

Tuesday, June 22, 2010

Finally!

Well, it took me a lot longer that I thought it would, but here it is! This is A Breath of Avignon fabric by Moda, and the Three Coins pattern by Miss Rosie's Quilt Co. (See previous post.)
I have adapted the pattern a bit to fit my king size bed. Instead of 9 blocks (3X3) in the center, my center consists of 16 blocks (4X4). That meant 20 star blocks instead of 16. I also added an additional row of half square triangles around the outside edge. That made the outside edge look like the blocks in the center. I think I will also add one more border, perhaps one of the red fabrics, to bring out the red in the stars. The pattern doesn't call for a border, but I think I need to make it a little bigger (You can see my current quilt peeking out underneath the new top.....) We do sell the kit in the shop. (It's not online yet, and it's going so fast that I don't think we will put it up there.) You can call the shop if you want to order one....406-420-1003. I bought two kits to make my quilt. I did have some fat quarters left over.....I will use them to make pillows!


Wednesday, March 3, 2010

LOVE AT FIRST SITE...A BREATH OF AVIGNON

I can't explain it....maybe it was my honeymoon in France.....but I loved this fabric from hello! I had been eagerly awaiting A Breath of Avignon, this new Moda line from American Jane designer Sandy Klop. It finally arrived a week or so ago. We have been cutting kits and I've started on the shop sample of Three Coins by Miss Rosie's Quilt Company.


Believe it or not, cutting it out took a day and a half! (I am almost doubling the original size of the pattern, but we kitted it up like the pattern, 72" X 72".)

I love putting the star blocks together!

This quilt will obviously turn out brighter than the original. Hope it works as well as that one!

P.S. I have never met a Miss Rosie's pattern I didn't love!


I make myself pay for my goofs! ($1 per goof if I have it....)

There have been a few..... Of course, those $$ get recycled at the next quilt show!

Stay tuned, I hope to have the top finished before I go to Chicago on the 17th.... Wish me luck....